Installation
Just install like any other plugin and make sure it's placed after the required plugins. If you're unsure on how to do it, please check the plugin installation tutorial.Test the plugin
Right-click on any map on your project and click on Edit:
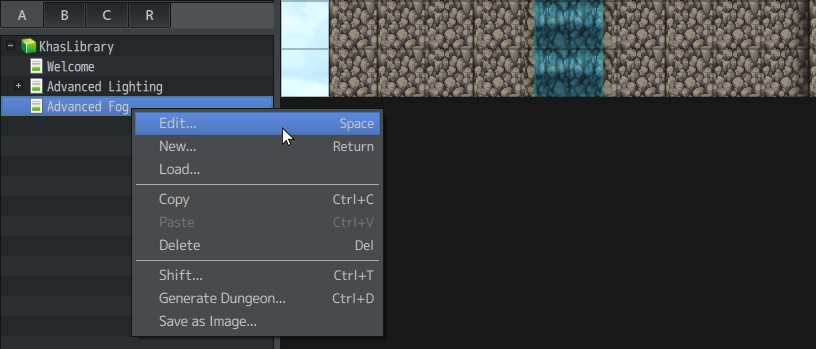
Then, add the [fog medium] command to its note:

Click OK, save and run the game. Start a new game and transfer the player to that map. It should look like this:

Tutorial
This plugin works like a state machine, that is, there's the fog state on the game and it can be set to OFF or to any fog. Then, the system will remain at that state until you use a command to switch to a new state. Please note that the state persists after saving/loading the game.
You can change the fog state by using the Fog plugin command, like below:

You may use Fog fogname or Fog OFF. The following fog names are available with the plugin:
rare
medium
dense
You can set your own fog styles - there's more detail below.
The most convenient way to change fog state is to use a map command, as you did when testing the plugin. Then, whenever the player is transfered to that map, the command will run and change the fog to a new state. However, this command will run only if AutoFog is enabled (it's enabled by default). If you want to set AutoFog ON/OFF, please use the following command:

If AutoFog is OFF, the map command will be ignored and the state will be preserved between map changes.
Let's say you have a map that you want without fog during the day, and with rare fog during the night. Additionally, let's say that the switch 36 is ON whenever it's day, and switch 37 is ON whenever it's night. Thus, in order to have the desired effect, you may use the following commands:

The [fog state switchId] command runs only if the given switch is ON at that time, regardless of the AutoFog setting.
Now that you understand the system better, it's safe to let you know that it actually has two fog states: one for the map and one for battles. Like above, the battle fog state will remain the same until changed.
Let's say you transfer to a map where battles should have medium fog. Then, you can use the following plugin command:

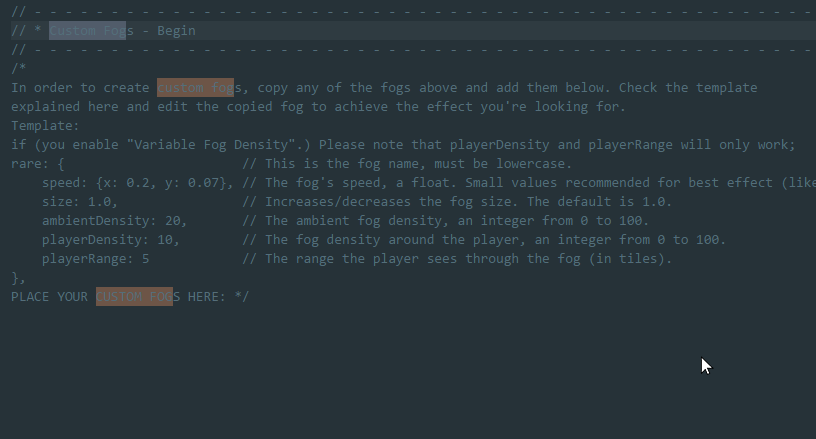
If you want to create custom fogs, you will need to edit this plugin. You can do that in notepad, but my recommendation is to use Notepad++ or Microsoft Visual Studio Code.
Once you opened the plugin, search for Custom Fogs. Then use the templates/examples there to create your custom content! Please note that some programming experience is recommended.
Tutorial - New Features (version 3.0)
The version 3.0 makes battle fog way easier! If you set the new Auto Battle Fog plugin parameter to ON, the fog state will be picked from the current map fog.
Another new plugin parameter is the Transfer Reset one. It you set it to ON, the fog is reset after every transfer (set to off).
Now fogs can have colors! You can set the fog color with an optional parameter on its definition, like below:
color: {"r": 0-255, "g": 0-255, "b": 0-255}
Please check the Custom Fogs code for more details and examples.
Offline Version
A pdf for this tutorial can be found here (thanks to New Quest Gaming).